TSP Printer Setup
Connect the printer to a iPad, iPhone or computer, and configure wireless LAN settings for the printer.
(Step 1) Print out a configuration page from the TSP Printer by holding down the FEED button while the printer is turned off. Turn the printer back on and a few pieces of paper should print out. When the papers are finished printing, take note of the "IP Address" that is on one of the papers. It should start with 192.
(Step 2) Open the Setting app of the tablet and select WiFi.
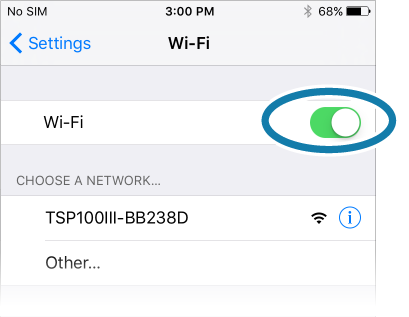
(Step 3) Check the printer’s power is on.
Under the list of available wireless networks, find the WiFi network name resembling the following, for example: "TSP100III-XXXXXX".
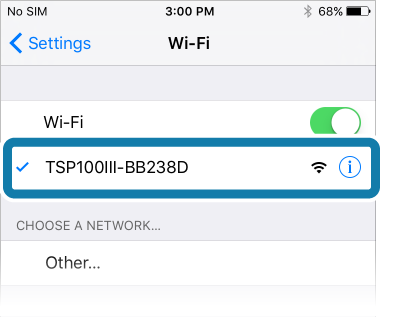
- When a connection is established, the network name will appear under Wi-Fi with a check mark or it may say that the network is disconnected (totally normal).
Web Configuration
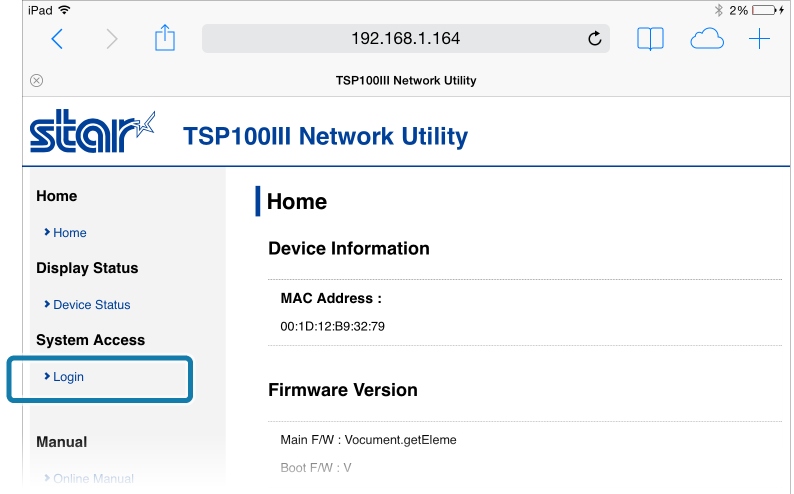
Log into Web Configuration
(1)
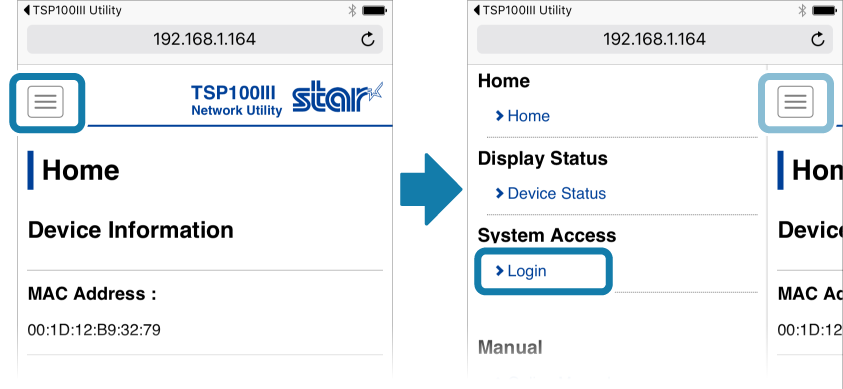
Open the web browser Safari on an iPad or iPhone that is in the store. Proceed to then type in the search bar, the IP Address that was retrieved as highlighted in Step 1. Next you press [Login] from the menu displayed on the left side of the setting screen.
or the menu button
 displayed on the upper left, and open [Login].
displayed on the upper left, and open [Login].
(2) Login with:
Login name: root /
default password: public
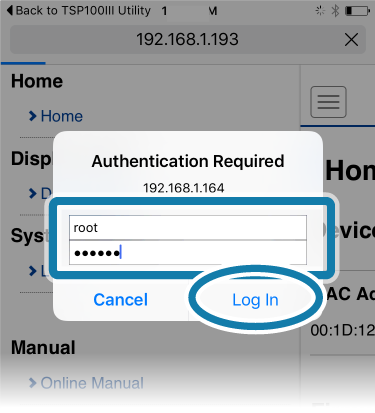

The default login name and password are as follows:
Login name: root
Password: public
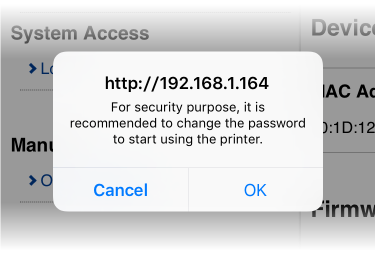
(3) The following message is displayed when you are using the default password. Select [OK] to change the password.
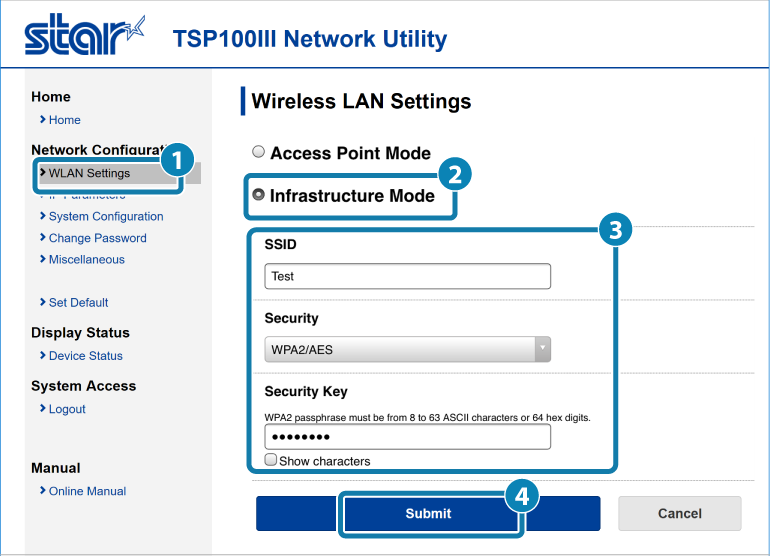
Set wireless LAN settings
Set the network information of the network to the printer.
From the menu displayed in the left side of the settings or the menu button
in the upper left,
in the upper left,
 Open "WLAN Settings"
 Select "Infrastructure Mode " (THIS IS A MUST STEP IN THE PROCESS)
 Enter in the SSID column - "UNTUCKit" > Choose from Security dropdown - "WPA2/AES" > Enter WiFi password (choose "show characters" to confirm entry)
 Tap "Submit" button
A screen where you can check and save the entered details will appear.
Press "Save"
Save -> Configuration Printing -> Restart device should come up. Please press that.
The settings are saved to the printer and printed out.

Related Articles
How to add a printer in NewStore (2024)
Follow the steps in the attachment tab to successfully add printers via NewStoreZebra Printer Setup
How to setup a Zebra Printer SECTION 1: Connecting to a Zebra printer via Bluetooth: 1. Open the Printer Setup app (If the app is not found, please use the Self Service app to install the Zebra Printer Setup Utility) 2. Select Menu to open the Side ...How to Reset TSP Receipt Printer Configuration?
Network settings that were changed such as IP address, subnet mask, disabled dynamic IP address (DHCP) can be returned to the settings when it was purchased. When you have changed the wireless LAN settings of the main unit, and it can no longer ...Setup | Zoom Video Communications
Here's what will happen to get you started (this takes 5 minutes, don't worry) Step 1: You will be receiving an email from Zoom asking you to join Untuckit's Zoom Account. Follow the instructions to create your own password, this will set you up with ...Zoom Quick Setup
Here's what will happen to get you started (Entire Process should take about 5 minutes) Step 1: You will be receiving an email from Zoom asking you to join Untuckit's Zoom Account. Follow the instructions to create your own password, this will set ...